
Developing Your Vapor Phase Hydrogen Peroxide Cycle
By BioPhorum

Vapor phase hydrogen peroxide (VPHP) has been used for decades as a surface decontaminant in pharmaceutical applications, particularly in filling isolators, sterility test isolators, pass-through chambers, and room-fogging applications. However, there is little industry guidance on what should be evaluated during the process of establishing successful bio-decontamination parameters — a process described as cycle development.
This article outlines how cycle development fits into the validation life cycle and what constitutes a standard process for cycle development for all VPHP bio-decontamination processes.
The Technologies Used For VPHP Bio-Decontamination
In commercial applications, bio-decontamination using hydrogen peroxide (H2O2) is achieved using one of the following techniques: vaporized H2O2 (hot-plate vaporization), aerosolized H2O2 (fogging), and ionized H2O2 (passing H2O2 through an ionized plasma field). These techniques differ with regard to how the H2O2 is delivered to the environment with VHP most commonly selected for isolators and enclosed systems. This article will focus on the first two techniques as these are the processes currently used by BioPhorum members.
Factors To Consider During The Design And Qualification Stages
Design
The definition of the key parameters for new equipment begins at the design stage. At this point, it is important to understand the overarching quality assurance policies affecting the bio-decontamination process and the contamination control strategy for the process being defined. A technical specification or datasheet (i.e., user requirements specification) should be produced that includes many performance requirements, including parameters that define the bio-decontamination cycle, such as:
- Maximum acceptable cycle duration
- Materials of construction and their resistance to H2O2
Commissioning
The commissioning phase demonstrates that the equipment built by the vendor functions as specified and that the functionality described in the user requirements specification is correct. This phase is usually composed of testing at the factory (factory acceptance tests) and then testing on site (site acceptance tests).
Qualification
The qualification phase tests installation and equipment functionality, including factors that could affect bio-decontamination cycle parameters. This phase is typically divided into installation qualification and operational qualification.
Bio-Decontamination Cycle Development
This phase defines the critical bio-decontamination cycle parameters by evaluating conditions within the chamber and challenging the cycles with suitable biological indicators (BIs) to demonstrate an acceptable level of spore log reduction.
This ensures the bio-decontamination cycle is repeatable and delivers bio-decontamination to the standard required for the specific process, filling isolator, sterility test isolator, or pass-through chambers.
The cycle development approach is agreed upon in collaboration with the equipment supplier during the design phase of the project. Many parameters critical to success will depend on the equipment design and the VPHP technology used; depending on the technology, slight differences from the principal concepts outlined may be required.
Activities Performed Before Starting Cycle Development
Defining The Key Starting Parameters For The Equipment
Starting parameters, such as hot-plate temperatures and starting H2O2 injection rates, are defined before starting cycle development. These parameters are equipment- and technology-dependent and should be identified in collaboration with the vendor. The parameters need to be developed during the early qualification phases and before starting any cycle development activities.
Defining Room Conditions
The key parameters for the room where the isolator is located need to be defined before cycle development begins. These include room temperature, room differential pressures, and relative humidity ranges.
Defining The Bio-Decontamination Boundary
Full consideration should be given to understanding and defining the boundaries that need to be challenged to ensure effective bio-decontamination. This includes assessing the return locations, any indirect product-contact part locations, vacuum lines, etc., and deciding which present high or low contamination risks.
Defining The Load
For filling isolators, non-product-contact parts for the operation are assembled in the enclosure before starting the bio-decontamination cycle. The chamber may also contain tools for adjusting process equipment, sterile wipes, sterile bags, and other required materials. To ensure satisfactory bio-decontamination, some basic principles need to be followed:
- Loaded items should not overlap each other to facilitate contact with VPHP. Surfaces should be exposed to the environment in the enclosure without touching other surfaces to prevent occlusion of areas.
- All parts designed to be in motion during the filling process need to move slowly to ensure all equipment surfaces are exposed to VPHP.
- Materials that will allow penetration of H2O2 and any items that absorb VPHP (e.g., silicone and polyvinyl chloride tubing) and then outgas during aeration should be assessed with respect to cycle time requirements.
- Using fixed locations/orientations, similar to an autoclave load definition, with fixed hanging hooks (e.g., S-hooks) should be considered. Hanging baskets with occluded surfaces should be avoided.
Cycle Development
The following four steps form the basic requirements for a successful cycle development program and include studies to optimize the cycle to ensure that distribution of VPHP throughout the chamber and load will result in adequate bio-decontamination. Cycle development activities are usually performed with a fully loaded enclosure with all equipment turned on and operating.
Temperature And Relative Humidity Mapping
Mapping the temperature and/or humidity throughout the chamber is performed to plot and document the distribution of these characteristics throughout the enclosure. Temperature sensors and/or data loggers are used to record air and surface temperatures and to look for any hot and cold spots in the chamber. The temperatures achieved within the enclosure are equipment- and process-dependent and should be established by working with the equipment vendor during the earlier qualification stages.
VPHP Distribution Studies Using Chemical Indicators
Chemical indicators for VPHP bio-decontamination processes are defined in ISO 11140:2014 and have historically been used for VPHP visualization according to the Pharmaceutical Inspection Convention and Pharmaceutical Inspection Co-operation Scheme (PIC/S). Chemical indicator mapping studies are typically performed on at least one cycle before proceeding with any BI studies.
Lethality Studies Using Biological Indicators
Lethality studies aim to find the cycle parameters that result in a series of BI inactivation conditions within the enclosure and include assessing parameters for the BIs (see Figure 1).
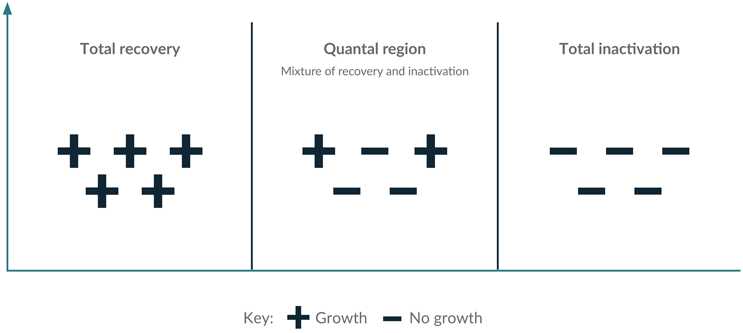
Figure 1: Inactivation zones
Unlike sterilization modalities, and due to the two-phase nature of VPHP bio-decontamination, there is no industry-recognized decimal reduction time (D-value) method for VPHP processes. The biphasic nature of VPHP precludes the accurate determination of specific lethal conditions (USP <1229.5> and <1229.11>) and therefore D-values captured in vendor certificates of analysis are not transferable to other systems/isolators, leaving end users to define their unique BI resistance. For example, a vendor’s certificate of analysis may indicate a D-value of 1.5 minutes; however, in-process testing may demonstrate that the system lethality is significantly more or less than this.
Location Studies Using Biological Indicators
Studies to find the worst-case locations for BI inactivation involve using many BIs placed in many different locations, requiring hundreds of BIs. For all methods, the goal is to determine which locations receive a lower concentration of VPHP, which would be indicated by BI recovery at those locations.
The selection of potential worst-case locations to place both chemical indicators and BIs is developed from an understanding of various factors, including:
- Temperature and humidity mapping, which identifies hot and cold spots
- Locations where vapor distribution may be difficult — these can be selected by working with the equipment vendor and/or through smoke generation inside the chamber to find the difficult locations where the smoke cannot reach easily or is not sufficiently mixed
- Geometrically challenging locations in the load
One approach to find the worst-case locations for inactivation is to use multiple BIs placed in many different locations, progressively increasing injection parameters until all BIs are killed and/or progressively decreasing injection parameters to determine worst-case locations, particularly if all BIs are killed in the initial test. Where possible, use triplicate BIs and find sites where all BIs are inactivated and sites where some of the three BIs are not inactivated. The next step would be to increase the injection time at the same injection rate iteratively until all BIs are inactivated. This will identify the worst-case sites with respect to BI inactivation.
Selecting The Number Of Biological Indicators For Cycle Development
The Parenteral Drug Association’s Technical Report No. 345 recommends that five to 10 BIs per m3 of enclosure volume is generally sufficient. The number and placement of BIs should always be supported by an assessment based on the chamber design, the bio-decontamination boundary, and the required spore log reduction defined in the contamination control strategy.
Biological Indicator Placement
Dating back as far as 2007, the use of one or multiple BIs can be found during qualification activities.1 While a minimum of one BI per location is required during qualification, benchmarking data show that some users choose to use three BIs at each location.
What Happens If There Are Positive Results From A Biological Indicator?
The level of investigation required for positive BI results should be aligned with the phase of cycle development or qualification. During early cycle development — when process parameters, loading configurations, and bio-decontamination conditions are still being established — BI positives may occur and are not unexpected. In this phase, positives primarily serve as diagnostic inputs for process optimization rather than indicators of process failure. However, in the later stages of development — including final confirmation runs and subsequent qualification activities, such as process performance qualification — BI inactivation should be consistently achieved.
Spore Log Reduction
The log reduction (sometimes referred to as “log kill”) is commonly required at a minimum of 6 log reductions for isolators. Historically, aseptic processing and sterility test isolators have used a 6-log reduction requirement. However, only one industry guidance document references this, i.e., PIC/S Isolators used for Aseptic Processing and Sterility Testing, which defines the sporicidal process as, “A gaseous, vapour or liquid treatment applied to surfaces, using an agent that is recognized as capable of killing bacterial and fungal spores. The process is normally validated using BIs containing bacterial spores. The number of spore log reductions is not specified in this definition, but a target of six log reductions is often applied.”
Development Of The Aeration Phase Of The VPHP Cycle
Routine Process
To ensure the aeration phase can consistently remove residual H2O2 from the enclosure, aeration studies are performed to measure residual VPHP. If the product is not sensitive to oxidation, electrochemical sensors may be used to confirm a routine production cycle endpoint for most systems; typically, aeration would be set to end at or below 1 part per million (ppm).
Aeration For Oxidation-Sensitive Products
Where products are oxidation sensitive (e.g., monoclonal antibodies and peptides), the aeration phase of the bio-decontamination cycle may be continued to remove VPHP residuals to parts-per-billion levels before introducing single-use parts or product into the system. Mapping studies must be performed to correlate the location used for routine VPHP measurements with the location where product will be exposed. In this case, a full aeration-cycle development study must be performed after the production cycle for BI kill has been finalized.
Validation (Process Performance Qualification Of The Bio-Decontamination Cycle)
A well-developed validation and production cycle will use parameters where all the BIs are inactivated, i.e., in the “Total inactivation” zone from Figure 1, with an additional safety margin (e.g., extended exposure time or higher dosing rate). This is to account for normal process variation and BI variation (e.g., population and resistance from lot to lot).
Validation is performed on the minimal effective cycle and will include a microbiological challenge performed at subminimal or minimally accepted cycle conditions and an aeration challenge performed at planned production parameters or slightly above. Loading conditions, parameter settings, BI quantity, and position(s) should all be clearly defined.
Production Cycle
Recipes for bio-decontamination cycles are created at the start of the cycle development phase. This starting recipe is modified throughout cycle development to form final recipes for validation and production that include:
- Injection parameters (derived from worst-case location/VPHP fractional studies)
- Aeration parameters
- Total cycle time
Requalification
Requalification is performed annually using at least one confirmation cycle with worst-case load patterns, following the same procedures and test methods used for the initial qualification. Aeration requalification may be performed for oxidation-sensitive product systems (where it is considered a critical attribute) at some periodic frequency, depending on the level of routine monitoring.
Conclusion
The purpose of the bio-decontamination cycle development process is to:
- Develop a cycle
- Ensure it is consistent
- Understand the factors that impact the cycle and the key parameters to measure and control
It is a critical part of the aseptic assurance process, where process understandings can be gathered, realized, and applied to develop a robust VPHP bio-decontamination process.
This article summarizes the main points from a recent BioPhorum paper on this topic. The paper includes extensive lists of references and appendices on the challenges with biological indicators during cycle development and new technology for VPHP cycles. To learn more, check out the full paper here.
References
- Pharmaceutical Inspection Co-Operation Scheme (PIC/S). Isolators used for Aseptic Processing and Sterility Testing. PI 014-3. 25 September 2007. www.gmp-compliance.org/files/guidemgr/PI%20014-3%20Recommendation%20on%20Isolators.pdf